No pipes or rolling papers on hand, but want a good smoke? Many cannabis users have likely encountered this problem at one point. Lucky for you, there’s a quick and easy fix. That is, to make a homemade bong out of a water bottle. If you’re curious about how to smoke weed out of a water bottle, read on.
Technically speaking, you can use any other plastic bottle to create a makeshift water pipe or bong. But, a water bottle is strongly recommended because it doesn’t leave any residues behind.
With just a few easily accessible items, you can transform any plastic water bottle into one of two types of homemade marijuana bongs. Both will produce massive, ultra-powerful rips that are not for the faint of heart. But if you’re in a rush and want something that can be created within minutes, then you can opt for a makeshift pipe instead. For sure, you’ll be able to find at least one method that works for you when you’re in a pickle.
Page Content
How to Smoke Weed Out of a Water Bottle Pipe
Using a plastic bottle to make a pipe is by far the easiest, most convenient method in this list. In fact, all you need is a pair of scissors, aluminum foil, and a toothpick to get started. While a bottle pipe likely won’t produce ultra-smooth hits, it’s still a good option in a pinch. Being simple to create also makes it well-suited for those who are learning how to make a homemade smoking device for the first time. Plus, pipes are a godsend if you don’t have access to clean water.
What You’ll Need
- A plastic bottle
- A pair of scissors
- A piece of aluminum foil
- A toothpick
Instructions
Step 1:
Ready your plastic bottle. Any size will do. Some prefer to use a 1-liter bottle, but a standard 16.9-ounce single-use water bottle will work just fine. Unscrew the lid from the bottle and discard it. Feel free to peel off the label if you want. Wash the plastic well and ensure that it’s fully dry before proceeding to the next step.
Step 2:
Take your aluminum foil. The thicker, the better. Cut off a small square measuring about 5 cm by 5 cm (or 2.5 inches by 2.5 inches). This will act as your pipe’s bowl.
Step 3:
Place the piece of aluminum foil over the opening of the water bottle. Gently press your thumb down to push the foil deeper into the opening. This is done to form a hollow, basin-like shape where you can pack the plant matter. After molding the bowl, wrap the foil securely around the top of the open water bottle.
Step 4:
Use a toothpick to puncture a few holes in the makeshift aluminum foil bowl. Around five or six holes should do the trick. If you don’t have a toothpick, then you can use other sharp, slender objects, such as a needle and a straight pin.
Step 5:
Pierce a hole on the upper section of the bottle – just above where the label ends. Use your scissors to make the hole bigger – around 2.5 cm (1 inch) in diameter will do. Be extra careful during this step. The last thing you want is to rip the bottle. This new hole will act as the mouthpiece.
Step 6:
Pack the bowl with the appropriate amount of ground-up weed. Make sure not to overpack. Take it slowly – you can always add more plant matter later.
Step 7:
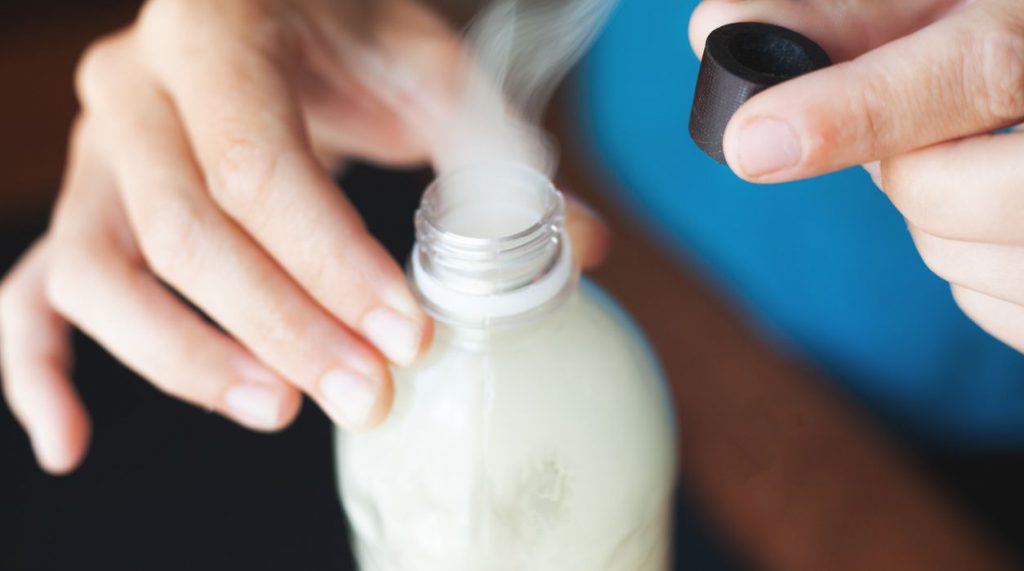
Place the mouthpiece against your mouth. Ensure that the hole is completely covered. Blaze up a corner of the bowl. Wait until the bottle fills with smoke.
Step 8:
Remove the flame and start pulling the cannabinoid-rich cloud. Enjoy.
How to Smoke Weed Out of a Gravity Bong
A gravity bong is also referred to as a geeb, geebie, GB, and several other quirky monikers. It offers a fun, easy way of consuming marijuana, and is perhaps one of the most popular DIY smoking devices.
In essence, a gravity bong involves the use of two empty plastic bottles. The smaller one, which has a bowl of cannabis on top, typically sits on top of the larger bottle or a bucket of water. After lighting up, the milky-white cloud will slowly fill the bottle. Before taking a hit, you’ll have to push down the smaller container. This is done to funnel the smoke through the water and to let gravity send the cannabinoid-rich cloud into your system.
Smoking out of a gravity bong is known to produce a stronger high than usual. That’s because this homemade bong forces a heavy concentration of smoke into your lungs – much more so than what you’ll normally get from a pipe or a joint. When you take a hit, after all, you’re essentially breathing in the smoke from an entire bowl of weed in one go. For this reason, gravity bongs are better suited for seasoned smokers than beginners.
Several types of gravity bongs exist, but the bucket bong and the waterfall bong are probably the most popular. They essentially operate the same way, except that the bucket bong is made out of two plastic bottles while the waterfall bong only uses one container. In any case, both are fairly straightforward to make and only require a few common household items.
Option 1: How to Make a Bucket Bong
As mentioned, the legendary bucket bong consists of two containers. The larger one has an open top and is filled with an appropriate amount of water. Meanwhile, the smaller bottle, which comes with a makeshift bowl and an open bottom, is placed into the bigger container. After blazing up the bowl, the user needs to slowly move the smaller bottle out of the water to create a pressure difference. This causes the bottle to fill with smoke, which users can inhale after removing the bowl.
While a bucket bong may sound like rocket science, it’s actually relatively simple to create. With enough creativity and determination, you’ll be able to construct a functional marijuana bong within 10 minutes or even less. Best of all, it only requires materials that are probably already lying around in your house.
What You’ll Need
- A small plastic water bottle
- A large plastic water bottle
- A sharp knife
- A piece of aluminum foil
- A toothpick
Instructions
Step 1:
Ready your plastic bottles. For the smaller container, 16- to 20-ounce ones are recommended. As for the larger one, stick to a 2-liter plastic water bottle. If you don’t have one, a bucket will suffice.
Step 2:
Use your knife to slice off the bottom section of your smaller plastic bottle. Don’t cut off too much, though. A couple of inches will do. That’s because the more material you leave intact, the larger the hit.
Step 3:
Snip the top off your larger 2-liter bottle. Fill it with water. If you’re using a bucket, then fill it with water instead.
Step 4:
Unscrew the cap from your smaller bottle. Use your knife to puncture a small hole on the bottle cap. Ensure that it’s large enough for you to draw air from, but not so much that the ground-up weed will fall right through it.
Step 5:
Wrap the piece of aluminum foil over and around the cap to create a makeshift bowl where you can load your cannabis. Push a finger into the center of the bottle to make the basin deeper. Peel off the excess foil, and shape the remaining one tightly around the cap.
Step 6:
Use your toothpick to pierce holes in the aluminum foil bowl. About 3 to 5 holes are enough to promote proper airflow. If you don’t have a toothpick, any other sharp poking tool with do. In any case, be extra careful to avoid accidentally tearing the foil.
Step 7:
Pack your ground-up nugs into the bowl. Don’t screw the cap on yet.
Step 8:
Push down the smaller bottle in the bottom section of the larger container or bucket. Keep at it until only the cap remains visible above the water. Carefully put the foil-covered cap back onto the bottle. Ensure that it’s tightly screwed on.
Step 9:
Light up a corner of the bowl. Start pulling the smaller container upwards. Do so slowly. Watch as the bottle fills with smoke.
Step 10:
Once you’re satisfied with the amount of smoke, unscrew the cap and position your mouth over the opening of the bottle.
Step 11:
Slowly push the smaller bottle back into the water. As the water starts filling the bottle, the cloud will be propelled into your lungs. Sit back and enjoy.
Option 2: How to Make a Waterfall Bong
The waterfall bong (also referred to as the “reverse bucket bong”) is only made up of a single container, making it much simpler to make and operate than a regular gravity bong. It has an attached bowl and a mouthpiece on top, as well as a small hole near the bottom to let the water drain easily. And as the water seeps out, the air is directed towards the bowl, causing the plant matter to smolder and release smoke. Users can start inhaling once the cloud completely replaces the water inside the makeshift bong.

What You’ll Need
- A plastic water bottle
- A screwdriver
- A pair of scissors
- A piece of aluminum foil
- A toothpick
Instructions
Step 1:
Ready your plastic water bottle. A 1-liter is ideal, but any size will do. Again, make sure that it’s clean and dry before use. Unscrew the cap from the bottle.
Step 2:
Use a screwdriver to jab a hole right in the middle of the bottle cap. If you don’t have a screwdriver, then you can use any other sharp object, such as a knife or pen. Enlarge the hole a bit until it measures about 0.6 cm (1/4 inch). Generally, the bigger the hole, the faster the draw. You don’t want it to be too big, though. That will cause the smoke to be less thick than usual.
Our advice: start with a tiny hole and make it larger. That’s because if you make it too big, you’ll need a new bottle cap and redo the whole thing.
Step 3:
Cover the perforated cap with a piece of aluminum foil. Make sure that it’s tight and secure. Cut off any excess foil. Don’t forget to pierce a few holes into the foil to allow the smoke to enter the bowl. This will serve as your bowl.
Step 4:
Create a hole near the bottom of the bottle. It should be small enough for your finger to cover.
Step 5:
Fill the foil-wrapped bowl with your desired amount of ground-up marijuana.
Step 6:
Cover the hole near the base with your finger and fill the bottle with water. Keep at it until the water level reaches the neck.
Step 7:
Carefully screw the cap back onto the bowl. Spark up a corner of the dried herbs. Take your finger off the hole. Watch as the water seeps out and gets replaced by the smoke. Remove the flame once the bottle fills with enough smoke.
Step 8:
Unscrew the cap once the water fully drains out and start pulling the smoke. Breathe in deeply so the smoke goes directly into your lungs. Enjoy.
No Bong, No Problem
Nothing beats a high-quality glass bong, especially if you’re seeking clean, aromatic, and intense rips that will send you straight to the clouds. Not to mention that in the best-case scenario, you should only stick to devices made with durable glass – not plastic – when you’re dealing with heat. This is because if you smoke out of plastic, some of the chemicals in it may leach into the marijuana fumes and, eventually, make their way into your body.
But still, there are times when you may find yourself in need of an alternative. Maybe you’re staying over at a friend’s and you left your bong at home. Maybe you accidentally broke your glass pipe. In this case, a homemade water bottle bong is better than nothing at all. Fortunately, there are several options to choose from, each of which is fairly straightforward to make and only requires simple household items. Once done, all you have to do is pack the bowl, light it up, and inhale as usual. Just keep in mind that a water bottle bong is not the healthiest way to consume marijuana. It’s not designed to be your primary smoking device, nor is it ideal for regular, repeated use. Instead, it’s meant to be used just once and only when you absolutely have to. (Meaning, when you don’t have any other option.) Remember, a real glass bong is still the best way to go.