Growing marijuana always seems daunting at first especially for people with little to no experience with gardening or plant cultivation. But nothing can be farther from the truth. Some have found success just by putting it in a small pot and setting it by the window. The only downside to that method is that you only get a few days’ worth of weed.
There is a way to put out more buds that can be done by just about anybody who is willing to learn. This guide is for beginners who are interested in growing their own cannabis. It contains information that is necessary for creating a small, indoor setup to caring for the plants in one’s modest garden. Not to mention, it is a primer for first-time growers who want to know how to optimize the growing environment for higher yields and a final product that is not only potent but also delicious.
Page Content
Lighting Equipment
Cannabis plants needs light. It is the energy that makes possible natural plant processes like photosynthesis through which the plant produces oxygen and glucose that help it grow. Naturally, the best source of light is the sun but this may not be an option for indoor environments.
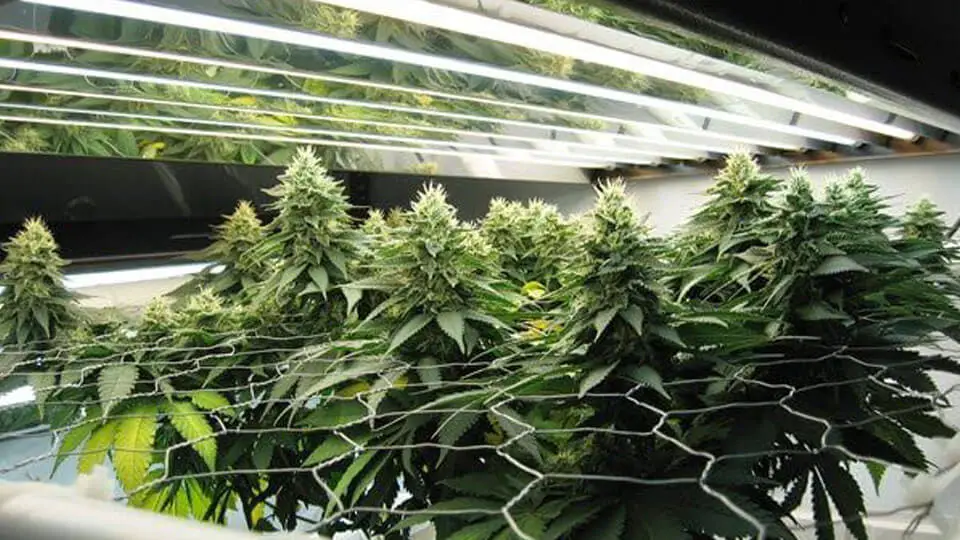
Thankfully, grow lights are available. They provide the necessary light and energy require indoors so it can grow into a robust plant. Growers can choose from compact fluorescent lamp (CFLs), metal halide (MH) lamps, high pressure sodium (HPS) lights, and light-emitting diode (LEDs).
CFLs are an excellent choice when it comes to growing cannabis for the first time or small setups. They are inexpensive but cost effective. It is also available in garden sections at many home depots. It comes in various shapes, sizes, and wattages however, the basic rule is 30 watts per square foot of the grow area’s floor space.
First-time growers will need two types of bulbs. One is daylight, which accommodates the seedling and vegetative phase of a plant’s life cycle. It helps it grow quickly and produce leaves. On the other hand, there is a warm, soft white that is optimal for when the plants enter the flowering stage.
Note: Because CFLs are easy to install, you can save up money by building your own system using separate light bulbs. Lighting fixtures that have all the needed bulbs are also available
Picking A Medium
Cannabis plants thrive when it has room to grow. This does not only refer to its stalks, but also to its roots. Mediums help growers provide this. To put it simply, mediums are substances which facilitate the development of cannabis roots. It is the mode through which growers can introduce water or nutrients for the plant to absorb.

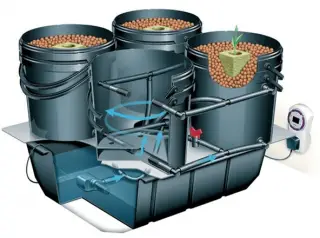
There are two ways to categorize mediums: soil or soilless. Anything that is not soil falls under the latter, including hydroponics, aquaponics, and aeroponics which are usually reserved for more advanced growers. In choosing the media, it is not only a matter of preference but also of skill.
Listed here are ones that are better suited to first-time growers.
Soil
The best medium for beginners is undoubtedly soil. Apart from being cheap, it is straightforward and simple. It affords growers with a margin of error which makes it easy to rectify growing mistakes.

Soils can be amended to include beneficial nutrients and minerals such as perlite, worm castings, peat moss, compost, and biochar among others. For indoor growing, the ideal potting mix is one that is peat based.
Compared to regular soil, one with no additives, the mix is light weight. This gives it incredible air and water holding properties, allowing the roots to dry properly while also retaining enough water for it to transport nutrients throughout the plant.
Note: When buying soil at your local gardening supply store, check out the ingredients list. It should have a complete breakdown of the organic nutrients used for the premix. There are also some products made only of base nutrients (either peat or coco fiber), so you can fill add what you want. Resources are available online for the ratio.
Coco Coir
Processed coco coir is a popular growing substrate. It has impressive water retention and provides roots with enough space for its roots to spread out without much obstruction. Growers need not worry about plants being ravaged by pests or bugs either. The organic product, which is manufactured by defibering coconut shells, is not a livable environment for many common garden insects.
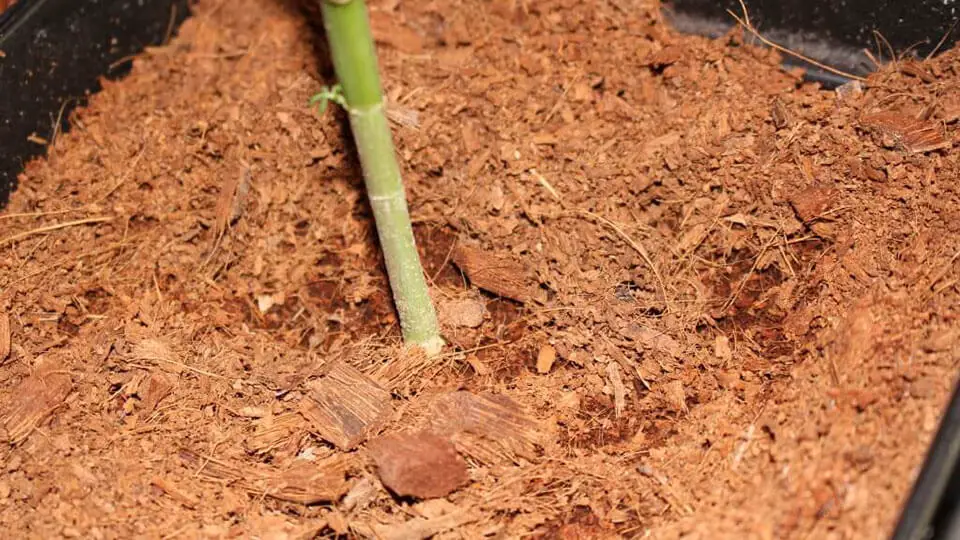
Its texture is similar to soil and could be handled like so. The major difference between the two is that soil already contains nutrients whereas, with coco coir, you will have to add them.
This is nothing to fret about though. More control means you can provide plants with the exact nutrients that they need which, ultimately, leads to explosive growth and bigger buds. And because more advanced growing mediums are soilless, it is great training ground for growers who want to hone their skill too.
Note: Due to coco coir’s impressive water retention properties, it would be best to add 30% perlite. This prevents water from swamping the plant and also paves the way for better aeration. You can also use clay pebbles if perlite is not available.
Essential Nutrients
One of the most important factors to consider when growing for the first time is nutrition. They are critical for cultivation, fueling the cannabis as it transitions from seed to mature plant. As it is with other types of flora, the three most important for nutrients are nitrogen (N), phosphorus (P), and potassium (K) – popularly abbreviated to NPK.

To ensure that the nutrients are properly absorbed, ensure that the pH levels are balanced. Test the medium periodically, especially when the plants exhibit symptoms like yellowing leaves. Otherwise, it might suffer from nutrient burn.
Note: When buying ready mix nutrients, check which stage it is for. Vegetating plants need 2-1-1 NPK or two parts nitrogen, one-part phosphorus, and one-part potassium, while flowering plants need 1-3-2 or 0-3-3 which means one-part or no nitrogen, three parts phosphorus, and two or three parts potassium. You can also mix your own.
Easiest Strains To Grow
Going for a difficult or sensitive strain as a beginner is never ideal. In fact, it could lead to a waste of time, effort, and money as plants grow only to die off before it can reach the flowering period or end up producing low-quality yields. Thus, the most crucial aspect in choosing which cannabis variety to grow is its ease of growth.
Easy to grow cannabis plants are not that difficult to find. In fact, many famous strains are also popular growing strains for beginners. They not only exhibit excellent recreational and medicinal benefits, but also high yields, short flowering times, and impressive trichome production.
Popular Strains Recommended for Beginners
- Blue Dream. The Sativa-leaning strain is a great addition to the grow room. It is potent, aromatic, delicious, and versatile.
- Northern Lights. This attractive bud is not only humongous, but also colorful. It flowers quickly, produces resinous flowers, and is highly immune.
- White Widow. The last choice is a hybrid. White Widow gains its name from the white cast that coats its buds.
Note: Check the label and description on the seed’s packaging before buying. Some require less water and nutrients while others need more. There are strains that have better resistance to certain pests and diseases which could be a proven advantage in the grow room.
Germinating The Seeds
Seeds are interesting. They look like pebbles but, in truth, they are plants encased in a protective layer with a good supply of food. The seeds remain dormant until it is ‘popped’ or germinated.
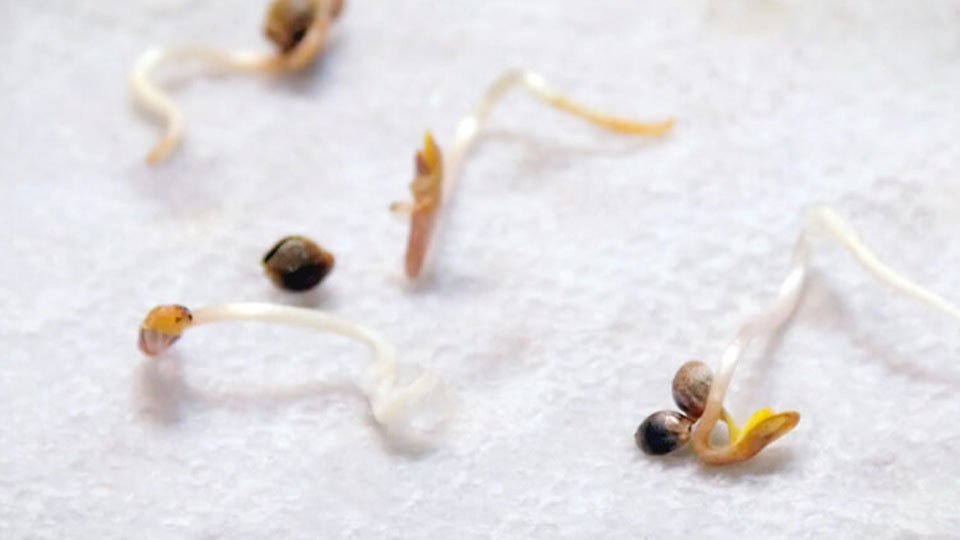
Germination is the process by which a plant grows from a seed. It triggers the growth process through moisture. At which point, it begins to expand, develop a taproot, and break through its shell within 1 to 7 days.
There are different ways to do it but the cheapest trick is the paper towel method. It requires putting the seeds on top of a moist paper towel, folding it, then placing it inside a small light proof container or plastic. Make sure to check its progress every 3 to 5 days. You will have to transfer the seedling to a medium afterward.
Starter kits are also available. It makes the germination process easier since growers no longer have to move out the seed once it sprouts, unless it is an auto flowering strain. They are usually made out of rockwool, a substance used for insulation and mold prevention but have to be soaked to stabilize its pH levels. Afterward, growers can then poke a hole and drop the seed before covering it back up so the light can’t go in.
Note: In both methods, warmth will play a positive role. Placing it on a sunny window or on top of a seedling heat mat sill will increase the chances of successful germination.
Ideal Environment For Different Stages
Like humans, cannabis plants go through different cycles throughout their lifetime. They start out as seeds germinated into seedlings that grow into young herbs, before eventually maturing into a full-grown cannabis plant. In each stage of development, the plant requires a different environment that will not only cater to its needs, but ensure that it attains the best qualities.
Seedling Stage
It is in this stage that the young cannabis starts to take on the shape of a miniature marijuana plant. CFL lights in the blue light spectrum are the ideal type of lights to use. Under a 24/0 or 18/6 light schedule, it can enhance the development of roots, stalks, and leaves.

Optimize the environment by monitoring the temperature and humidity around the plants. It should be around 20-25°C under CFL lights while RH would be around 70% for the next 10 to 21 days or up to three weeks. Gradually reduce the humidity by 5-10% as it nears the end of the seedling phase to ease its transition into the vegetative stage.
| Lighting Schedule | 18/6-24/0 day/night |
| Temperature | 20-25°C |
| Relative Humidity (RH) | 70% RH |
Note: One thing to remember about seedlings is that it is prone to disease, damage, and pests. Special care must be undertaken to ensure it does not die off. For instance, one should not overwater the plant as it can end its life prematurely. Feeding it with nutrients may not also be a great idea since it can easily poison the seedlings.
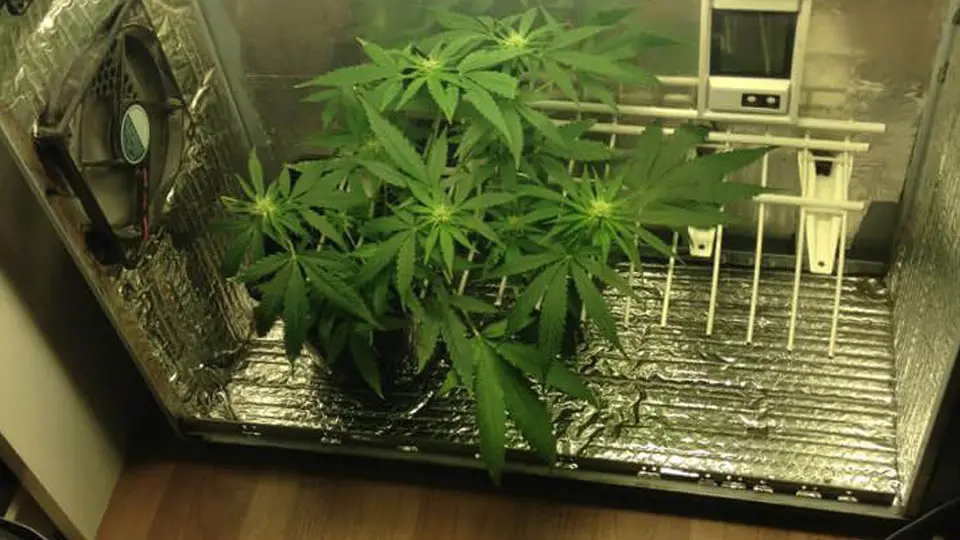
Vegetative Stage
Often called the growth period, the vegetative stage retains this nickname for the rapid, vigorous growth it experiences. It shoots upward, branches out, and develops a better root system that can absorb more nutrients. No doubt, the small seedlings will outgrow its small paper cup or rockwool block as it grows larger than ever.

First-time growers should schedule a transplant sometime soon. Autos in particular should be transferred to bigger pots immediately. They race into the flowering period within 2 to 3 weeks of vegetation. Regular and feminized varieties are often more forgiving. It has a longer vegetative period during which growers can then simply extend the next period to relieve the stress. If the seedlings are already in their final pot and medium, then there is no need to move them.
You can always expect a yield from any strain just from leaving them in a pot, watering, and feeding them a nitrogen-rich diet. However, training the plant and strategical cutting is what brings out its full potential. Try applying beginner-friendly Low-Stress Training (LST) methods which requires gently bending and securing the plant’s flexible stems away from the middle. It should look broader and flatter in shape which helps it create more stems and leaves.
A night cycle will be necessary during this stage. Apart from signaling the plant to prepare for flowering, these periods allow the plant and its roots to respire constantly. The room must be completely dark or else it will stress the plant and turn it into male which does not produce flowers. If tending is a must, do so under the illumination of a green light bulb.
| Lighting Schedule | 18/6 day/night |
| Temperature | 20-24°C |
| Relative Humidity (RH) | 50% RH |
Note: The typical vegetative stage lasts up to 8 weeks but photoperiod strains can stay in this phase indefinitely, allowing growers to practice training and pruning the plant. If conditions permit, you can set aside one or two plants and keep it in this state to hone your skills.
Flowering Stage
Bud production starts during the flowering stage which makes it imperative that growers create the optimal environment for the next 6 to 12 weeks. This means ensuring that the temperature inside the grow area is between 20-28°C and gradually reducing relative humidity to 40-50%. From 18/6, the lighting schedule should be switched to 12/12 throughout the 8 to 11 weeks that it is blossoming.

It is also in one’s interest to reduce the nitrogen in its diet. Too much of it in the bloom base nutrients will harshen the taste, making its smoke quite sharp. Instead, focus on adding more phosphorous and potassium which determine quantity and size of the bud respectively. A general rule is to have a ratio of 1-3-2 NPK during early to mid-flowering, followed by 0-3-3 for late flowering.
If you bought regular seeds, then you can usually tell its gender within a few weeks into the blossoming stage. It is crucial that the males, which you can determine by the presence of pollen sacks, are separated as they can pollinate the females or turn them into hermaphrodites. Feminized seeds usually ensure an all-female grow.
The buds that develop during this period start to fatten up. A slew of new hairs will pop up around the bud. Most likely, trichomes and resin will begin to coat it too.
| Lighting Schedule | 12/12 day/night |
| Temperature | 20-28°C |
| Relative Humidity (RH) | 40-50% RH |
Tip: The flowering stage is not the time for training, so avoid it as much as possible especially once three weeks have passed into the phase. It can upset the hormones, leading to reduced quality in yield. If you think your plants need support, then trellis them.
Harvesting Cannabis
When trichomes begin to coat the buds, they are usually white in colors. The hairs or the pistils, on the other hand, appear brighter. But as the weeks progress and the flowering periods nears the end, it will deepen – signaling to growers that it is nearing maturity.

There are a few things to do before cutting your flowers. One, you should wait until at least 70% of the pistils or hairs have darkened and the trichomes start to look milky or cloudy with a few hints of amber. Second, you have to flush out the nutrients.
The flushing process is quite easy. A week or two before harvest, stop feeding the plants with nutrients and just stick to pure water. This will remove any of the nutrients residing in the plant, making it safer to consume the buds. It also creates a smoother smoke and tantalizing flavor.

Once ready, you may then take a pair of scissors and cut off the plant product. Do a light trim but be careful of cutting away too many sugar leaves which have a light sprinkle of trichomes. You can start drying them afterward.
Note: Milky or cloudy trichomes are associated with a more cerebral buzz. Amber-looking trichomes usually have a more bodily effect. Although, ultimately, it is the genetics of the plant that determine its effects.
Drying And Curing Weed
Newly harvested buds are not ready for smoking yet. It needs to be dried and cured before anything else. Why? Because it increases makes the smoke smoother and increases a strain’s potency respectively.

Drying is easy. All one needs to do is hang the flowers upside down on a rack. However, it must be done in a cool, dark place with good ventilation so as to not attract mold. Otherwise, it could lead to bud rot.
The ideal conditions would be 21°C with 50% humidity. If the area where you live in is naturally humid, then you may want to invest in a dehumidifier. Drying usually lasts between 7 to 10 days.
Avoid raising the temperature to try and speed up the drying process. In fact, the first rule of drying is never to rush. Routinely apply pressure to the branches. If it bends, then it hasn’t fully dried yet. On the other hand, you can tell it has finally dried when the branches snap easily.
The buds usually continue to ripen even after it dries. This produces byproducts like sugar and molecules that leave a sharp smoke that is harsh on the lungs as well as an unpleasant taste. Curing slowly removes these compounds, creating a smooth and buttery smoke.
Curing also has other benefits like improving taste, increasing potency, and preserving the harvest. Properly cured buds could last up to 2 years without losing its taste or psychoactive strength.
Place the flowers in airtight containers. For best results, try to use mason jars or stainless-steel containers. Fill them up to 3/4 of their total capacity. This will give the buds room to breathe, preventing them from clumping and spreading mold.

Seal the jars and place them in a cool, dark area. Preferably, the relative humidity should be around 62%. Open the jars at least once a day to release excess humidity inside the jars and introduce fresh air.
The whole curing process could take up to 8 weeks and so patience is a must. However, the output is well worth the wait. It is better than smoking the dried buds right away in terms of flavor, potency, and smoothness. I personally prefer waiting at least 2 to 3 weeks before trying one out.
Note: If you’re planning on stashing your produce for a long time, consider dividing them first before placing each division in different airtight storage jars. The longest that buds can last without diminishing potency is about two years.
Keep An Open Mind
I hope this Beginner’s Guide to Growing Marijuana Indoors has helped you. Feel free to ask questions below if you have any.
Since this is your first time growing, you will likely run into some problems. It can get disheartening especially when it happens more than a few times. The important thing is to not give up on your plants.
Rather, keep an open mind. Ask yourself what the cause is and what you can do when your plants are fazed by pests or disease. You will find that the knowledge you gain now will help you in future grows. In fact, it could be the key to your transformation into a better grower.